
If you’ve ever traded gold (XAUUSD) during an FOMC rate decision, you know the feeling: price is calm at $2650, spreads look normal, and then one 5-minute candle rips $18 up, snaps $24 down, and somehow closes right where it started—taking your stop and your confidence with it.
This guide is built to stop that from happening.
In this article, we’ll lay out a XAUUSD FOMC strategy you can execute like a checklist: what to do 60 minutes before the Fed decision, how to filter volatility and spreads, how to handle slippage, and how to confirm entries after the release—especially when you’re trading with signals and want clean, repeatable execution.
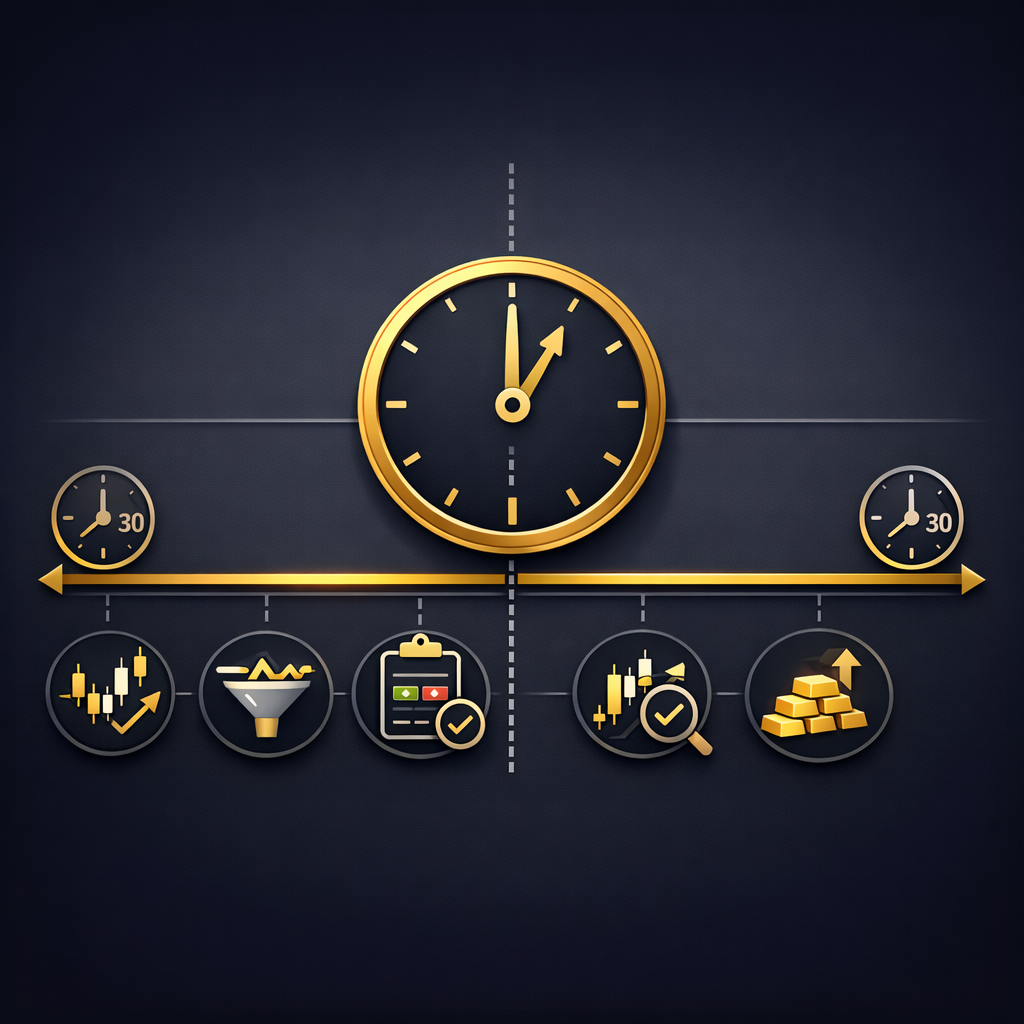
TL;DR: The 60-Minute Pre/Post-FOMC XAUUSD Plan
- Don’t “predict” FOMC. Trade reaction + confirmation using a time-boxed plan and strict volatility/spread rules.
- 60 minutes pre-FOMC: mark levels, reduce risk, set platform rules, and decide what you will not trade.
- Volatility filter: if 1-minute candles exceed ~$6–$8 repeatedly or spreads widen beyond your threshold, pause execution.
- Spread/slippage rules: avoid market orders at the release; use limits only after confirmation or structured stop entries with defined max slippage.
- Post-release framework: wait for the first impulse, then trade the pullback or consolidation break with $10–$25 stops and 1:2 to 1:3 R:R.
- Partial take-profits: lock TP1 quickly (e.g., +$20) and trail the rest using structure to survive the second wave (press conference).
Why FOMC Moves XAUUSD So Violently (And Why It Whipsaws)
To trade gold during a Fed rate decision, you need to understand what the market is actually repricing.
Gold is priced in dollars and competes with yield. So when the Fed changes the expected path of rates, the market instantly recalculates:
- Real yields (nominal yields minus inflation expectations)
- USD strength (often seen via DXY—currently around 106.80)
- Risk sentiment (risk-on can hurt gold; risk-off can boost gold, but not always)
In today’s context, gold is trading around $2650 (+0.35% in 24h). EUR/USD is near 1.0520, GBP/USD 1.2680, and USD/JPY 149.50. That combination tells you something important: the dollar is firm and rates are sensitive.
On FOMC days, the whipsaw usually comes from two separate information drops:
- The rate decision + statement (the first shock)
- Powell’s press conference (the second shock, often the real trend)
Even if the rate is unchanged, the statement language can shift expectations. A single word change (e.g., “appropriate” vs “necessary”) can flip the market’s rate path pricing.
Then there’s the dot plot meetings. When dots shift, gold can move $30–$60 in minutes. That’s why a normal day stop of $8–$12 can be suicidal during FOMC.
The key idea: FOMC is not one event. It’s a sequence of repricing waves. Your plan must survive wave one and position you for wave two.
The “Two-Phase” FOMC Map: Decision Candle vs. Confirmation Trade
Most traders blow up because they treat the release as the entry signal.
Professionals treat the release as the information shock, then wait for the market to show its hand. That’s the core of trading gold signals around FOMC: you’re not trying to be first—you’re trying to be right with controlled risk.
Phase 1: The Decision Candle (0–5 minutes)
This is where spreads widen, liquidity thins, and algorithms hunt stops.
In XAUUSD, it’s common to see a 1-minute candle swing $10–$20 during the first minute. If you’re using a tight stop, you’re basically donating.
During phase 1, your job is not to trade. Your job is to observe:
- How far did price spike from the pre-release range?
- Did it reject a major level (like $2665, $2678, $2640)?
- Did DXY spike and hold, or snap back?
Phase 2: The Confirmation Trade (5–30 minutes)
After the first impulse, price often forms one of three structures:
- Pullback continuation: strong impulse, then retrace 30–60% and continue.
- Range expansion: fake break both sides, then real break with volume.
- Mean reversion: spike fades back into pre-FOMC range.
This is where a signal becomes usable. If you receive a United Kings entry during this phase, you have a realistic chance of getting filled with manageable slippage and a logical stop.
Think of it like this: phase 1 creates the map. Phase 2 gives you the road.
60 Minutes Pre-FOMC Checklist (The Non-Negotiables)
This is the part that separates “I got unlucky” from “I wasn’t prepared.” The market doesn’t care how good your analysis is if your execution is sloppy.
Here’s the exact 60-minute pre-FOMC routine we recommend when you plan to trade gold during Fed rate decisions—especially if you’re following premium signals from our community at United Kings gold signals.
T-60 to T-45: Define the battlefield
Mark the nearest obvious levels on M15 and H1. Around $2650, realistic levels might be:
- Resistance: $2665, $2678, $2690
- Support: $2640, $2628, $2610
Also mark the pre-FOMC range high/low from the last 2–3 hours. That range becomes the “trap zone” where whipsaws love to live.
T-45 to T-30: Reduce position size and set risk caps
FOMC is not the day to “go bigger because it moves more.” It’s the day to trade smaller because the error margin is larger.
Set a hard rule:
- Max risk per idea: 0.25%–0.75% (many traders do best at 0.5%)
- Max total risk for the entire FOMC window: 1%–1.5%
If your normal gold stop is $10, and FOMC requires $20, your lot size must be cut in half to keep risk constant. If you don’t do this, you’ll overtrade and overexpose.
If you need help building consistent sizing, keep our risk framework bookmarked: risk management strategies when using signals.
T-30 to T-15: Platform and broker hygiene
Execution errors spike during news. Fix what you can control:
- Close unused charts and indicators that slow your platform.
- Confirm your contract size (gold can be 100 oz, 10 oz, or broker-specific).
- Check your typical spread in calm conditions (e.g., $0.20–$0.40) and note a “do not trade” threshold (e.g., above $0.80–$1.20).
If your broker regularly widens spreads aggressively on XAUUSD during FOMC, your best strategy might be not trading phase 1 at all and only engaging after the first 5–10 minutes.
T-15 to T-5: Decide your “no-trade” conditions
Write these down. Seriously.
- If spread is above your threshold, you do not execute.
- If price is sitting mid-range (no clean level), you do not execute.
- If you missed the entry by more than $3–$5, you do not chase.
This is how you avoid turning a good signal into a bad trade.
Volatility Filters for XAUUSD Around FOMC (So You Don’t Get Whipsawed)
“Volatility” sounds abstract until you define it in numbers. Around FOMC, you need a simple filter that tells you whether the market is tradable for your style.
Here are three practical volatility filters we use for gold signals around FOMC. You can apply them in under 30 seconds.
Filter #1: 1-minute candle size rule
On normal sessions, a 1-minute candle on XAUUSD might be $0.80–$2.50. During FOMC, it can be $8–$20.
Rule of thumb:
- If you see 3 consecutive 1-minute candles larger than ~$6–$8, pause entries.
- Wait until candle size compresses again (e.g., back to $2–$4) before executing pullback setups.
This keeps you out of the “machine gun” phase where stops are random.
Filter #2: Spread expansion rule
Even the best setup becomes negative EV if the spread doubles or triples.
Example: You plan a buy at $2652.0 with a $20 stop at $2632.0 and TP at $2692.0 (1:2). If spread widens from $0.30 to $1.50, you’re paying a hidden cost that can ruin your R:R and trigger premature stop-outs.
Set a hard threshold based on your broker’s typical behavior:
- Trade allowed: spread ≤ $0.80 (example threshold)
- No trade: spread > $0.80–$1.20
Adjust those numbers to your broker, but keep the principle: if spread is abnormal, you wait.
Filter #3: “Level proximity” rule
FOMC trades without levels are gambling.
Before you execute any signal, ask: is price within $2–$5 of a meaningful level (range high/low, H1 supply/demand, previous day high/low)?
If price is floating in the middle (say $2650 with no nearby structure), the market can whip $12 up and $12 down and still be “doing nothing.” That’s where accounts die.
For more on surviving unexpected spikes, pair this plan with our event survival guide: how gold signals react to unexpected news events.
Spread, Slippage, and Order-Type Rules (The Execution Framework)
Most FOMC losses are not analysis losses. They are execution losses.
Gold moves fast, and the difference between your intended entry and your fill can be $2–$8 in seconds. That changes your stop distance, your R:R, and sometimes the entire idea.
Rule #1: Avoid market orders at the release
At the exact release minute, market orders are basically “fill me wherever.” That’s fine in a liquid market. FOMC is not that moment.
Instead, use one of these approaches:
- Wait and use a limit on the pullback (preferred).
- Use a stop entry only after the first 1–2 minutes if a breakout is clean and spread is acceptable.
Rule #2: Define max slippage before you trade
If your broker/platform allows slippage control, set it. If not, use a manual rule.
Example manual rule:
- If entry is missed by more than $3 on a pullback setup, skip.
- If entry is missed by more than $5 on a breakout setup, skip.
This stops you from turning a planned $20 stop into a $28 stop without realizing it.
Rule #3: Don’t widen stops to “make it fit”
During FOMC, widening stops feels logical. But if you widen the stop without reducing size, you’re increasing risk.
Keep the relationship fixed:
- Stop gets bigger → lot size gets smaller.
- Lot size stays same → stop must stay within plan.
Rule #4: Use partials to reduce psychological load
FOMC trades can go +$25, then retrace $18, then run another $40. If you don’t take partials, you’ll often panic-close at the worst moment.
We’ll detail partial take-profits later, but the execution principle is simple: bank something early so you can let the runner work.
Signal vs DIY During FOMC: What Changes (And What Doesn’t)
Trading with signals around FOMC is powerful, but only if you understand what a signal can and cannot do.
A premium signal can give you:
- Clear entry/SL/TP structure.
- Bias based on multi-timeframe context.
- Timing aligned to London/NY liquidity (where most real moves occur).
But a signal cannot control:
- Your broker’s spread expansion.
- Your fill price and slippage.
- Your tendency to chase or revenge trade.
That’s why you need an execution plan that wraps around the signal.
| Approach | Best Use During FOMC | Main Risk | How to Mitigate |
|---|---|---|---|
| Signals (confirmation entries) | Trade pullbacks after first impulse; structured SL/TP | Late entry or slippage ruins R:R | Max slippage rules; skip if missed by $3–$5 |
| DIY breakout trading | Only if spreads stable and levels clean | Fakeouts and stop hunts | Wait for candle close + retest |
| Straddle orders (buy stop + sell stop) | Rarely recommended for retail | Both sides triggered in whipsaw | Use only with strict cancel rules and wide buffers |
| No-trade / observe | When spreads are extreme or structure unclear | FOMO | Pre-written rules; trade the press conference instead |
At United Kings, our focus is signals that are executable in the real world: clear levels, realistic stops, and timing aligned to high-liquidity windows. If you’re exploring how signals fit your style, start with United Kings signals and compare them with our broader education inside the community.
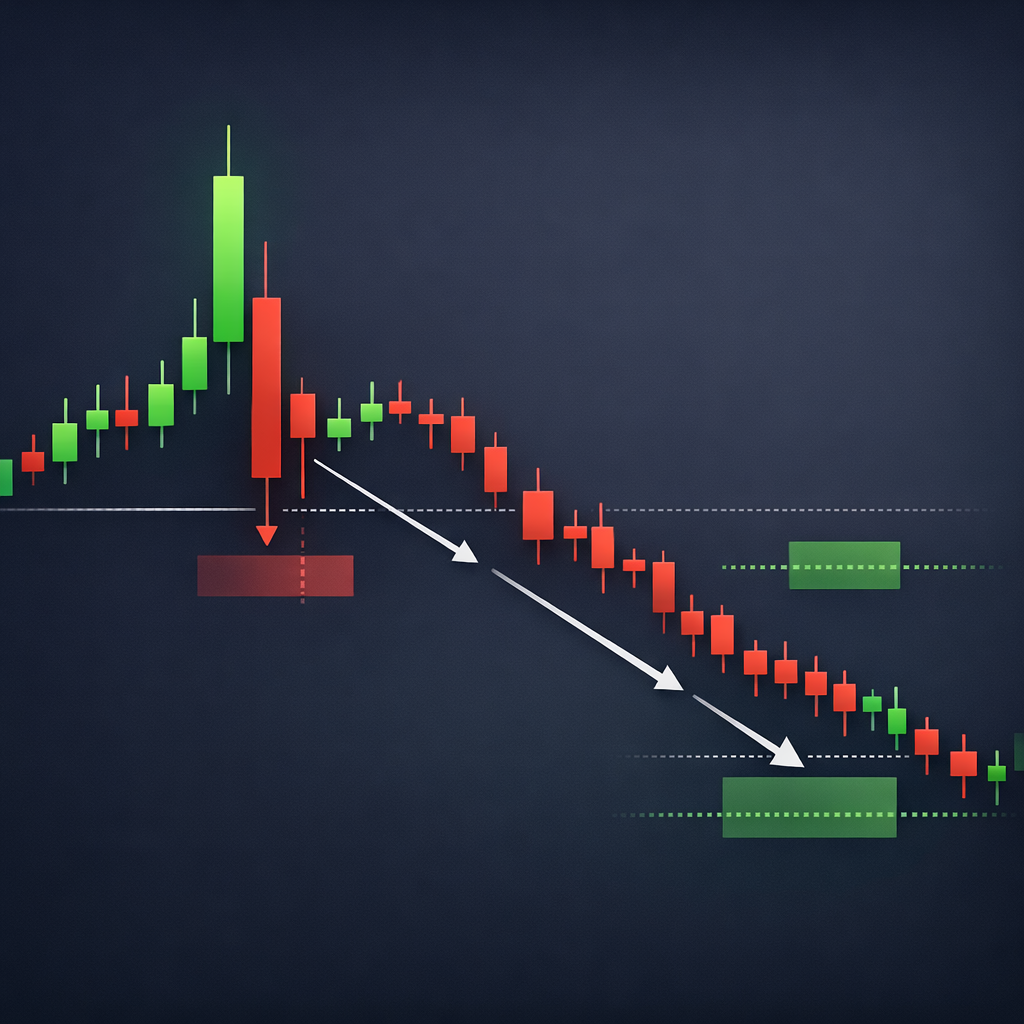
The 0–10 Minute Post-Release Plan: Survive the First Wave
The first 10 minutes after the FOMC decision are where most retail traders lose money. Your goal is not to “win big” here. Your goal is to not lose stupidly.
Minute 0–2: Hands off, eyes on
When the number hits, do nothing for 60–120 seconds. Let the algorithms fight.
Watch these three things:
- Impulse direction: did gold spike above $2665 or dump through $2640?
- Rejection behavior: did the candle wick hard and close back inside range?
- DXY reaction: does DXY hold above ~106.80 or snap back?
If gold spikes to $2678 and immediately dumps to $2648, that’s not a trend. That’s a liquidity event.
Minute 2–5: Identify the “decision range”
Mark the high and low of the first 1–3 minutes. That becomes your micro-range.
Example:
- High prints at $2676
- Low prints at $2642
That $34 range is your danger zone. Price can ping-pong inside it and stop you out both ways.
Minute 5–10: Look for the first tradable structure
Now you’re hunting one of two structures:
- Close-and-hold: price closes beyond a key level (e.g., above $2665) and holds above it for 2–3 minutes.
- Retest: price breaks a level, pulls back to it, and respects it (ideal for limit entries).
If you’re receiving a signal during this window, you still apply your filters: spread acceptable, candle size compressing, and entry near a level.
The 10–30 Minute Confirmation Framework: High-Probability Entries
This is the heart of the plan. Between minutes 10 and 30, the market often transitions from chaos to structure.
We’ll use realistic prices around current levels to show how to execute.
Setup A: Bullish continuation (pullback buy)
Scenario: FOMC is interpreted dovish. DXY softens from 106.80, and gold holds above $2665.
Structure:
- Impulse: $2650 → $2678
- Pullback: $2678 → $2662
- Reclaim: price reprints above $2665 and holds
Execution example:
- Entry: Buy $2666 (after hold/retest)
- Stop loss: $2648 (risk $18)
- TP1: $2702 (reward $36, 1:2)
- TP2: $2720 (reward $54, 1:3) — only if volatility stays constructive
Note: Our guideline range for examples is $2610–$2690, so if you want to stay conservative, you can cap TP2 near $2690 and trail the rest using structure.
Setup B: Bearish continuation (retest sell)
Scenario: FOMC is hawkish. DXY holds firm near 106.80 or spikes, and gold breaks $2640.
Structure:
- Impulse: $2650 → $2628
- Pullback: $2628 → $2642
- Rejection: $2640–$2642 acts as resistance
Execution example:
- Entry: Sell $2638
- Stop loss: $2656 (risk $18)
- TP1: $2602 (reward $36, 1:2) — or conservative TP inside $2610 if you prefer
- TP2: $2584 (reward $54, 1:3) — only if trend accelerates
The key is not the exact numbers. The key is the process: impulse → pullback → confirmation.
Confirmation tools (keep it simple)
- 1-minute/3-minute closes above/below the level.
- Wick behavior: smaller wicks after the initial spike = stabilization.
- Market structure: higher lows for buys, lower highs for sells.
You don’t need five indicators. You need clean confirmation and disciplined execution.
Stops, Take-Profits, and Partial Scaling (Built for FOMC)
FOMC is where “perfect” TP planning meets reality. Gold can move $40 in your favor and still come back to your entry before continuing.
Your exit plan must handle that.
Stop placement: $10–$25 is normal during FOMC
In calm markets, you might use $8–$12 stops. Around FOMC, $10–$25 is more realistic depending on structure.
Rules for stops:
- Stops go beyond structure, not “where it feels safe.”
- Stops should be outside the decision range when possible.
- If the required stop is too large, reduce size or skip.
TP framework: TP1 fast, TP2 patient
A clean FOMC approach is a two-target model:
- TP1: 1R to 1.5R (quick cashflow, reduces stress)
- TP2: 2R to 3R (the trend capture)
Example buy:
- Buy $2654
- SL $2638 (risk $16)
- TP1 $2686 (reward $32, 1:2) — within our $2690 guideline
- TP2 trail using higher lows on M5
Partial scaling plan (simple and effective)
Here’s a structure we’ve seen work for signal followers:
- Close 40%–60% at TP1.
- Move stop to break-even + $1 to $3 only after price stabilizes (not instantly).
- Let the remainder run to TP2 or a trailing stop behind M5 structure.
Why not move to break-even instantly? Because FOMC pullbacks are deep. If you move too soon, you’ll get tagged out and watch price run without you.
When to stop trading (the underrated skill)
Set a “done for the event” rule:
- After 2 trades, win or lose, you pause and reassess.
- If you hit your daily loss limit (e.g., -1%), you stop.
One good trade is enough. FOMC doesn’t pay extra for overtrading.
The Press Conference Trap (And How to Trade the Second Wave)
Many traders think the event is over after the rate decision. Often, the best move happens during Powell’s Q&A.
Here’s why: the statement can be interpreted in multiple ways. The press conference collapses that uncertainty into a clearer narrative.
What the second wave looks like on XAUUSD
- Gold spikes up to $2678 on the statement.
- Gold retraces to $2652 as liquidity normalizes.
- Powell sounds hawkish, yields tick up, DXY firms.
- Gold breaks $2640 and trends to $2620.
That sequence is common. It’s not “random.” It’s repricing as clarity increases.
How to trade it without getting chopped
Use the same confirmation framework, but tighten your focus:
- Trade only at major levels ($2665/$2640/$2628 type zones).
- Wait for a 5-minute close beyond the level.
- Enter on the retest with a $12–$22 stop.
Press conference trades often trend smoother because spreads normalize compared to the first minute of the decision.
Practical example (second-wave sell)
- After the initial chaos, price consolidates $2658–$2666.
- During the press conference, gold breaks $2658 and closes M5 at $2652.
- Entry: Sell $2654 on retest
- SL: $2672 (risk $18)
- TP1: $2618 (reward $36, 1:2)
- TP2: trail toward $2610 support
This is how you trade the “real move” without paying the worst spread of the day.
Common FOMC Mistakes Signal Traders Make (And How We Prevent Them)
Signals don’t fail traders. Traders fail signals—especially on news.
Here are the most common mistakes we see, and the exact fix for each.
Mistake #1: Chasing a missed entry
You get a buy signal at $2658. Price is already at $2666. You enter anyway, because you don’t want to miss it.
Now your stop is either too tight (you get stopped) or too wide (you risk too much). Either way, the trade is no longer the same trade.
Fix: apply the max slippage rule ($3–$5). If missed, wait for the next setup.
Mistake #2: Taking signals inside the decision range
If the first 3 minutes create a $30–$40 range, that range is a blender.
Fix: trade only after price exits and confirms beyond the range, or trade the retest of the boundary.
Mistake #3: Oversizing because “it’s FOMC”
Yes, the move can be big. But the noise is bigger too.
Fix: reduce risk per trade to 0.25%–0.75% and set a total event risk cap.
Mistake #4: Ignoring correlated markets
Gold doesn’t move in isolation. During FOMC, DXY and yields often lead.
Fix: keep DXY (106.80 area), EUR/USD (1.0520), and USD/JPY (149.50) on a watchlist. You’re not trading them, but you’re reading the message.
Mistake #5: No routine, only emotion
FOMC triggers adrenaline. Adrenaline triggers impulsive decisions.
Fix: use a written checklist and a time-boxed plan. If you’re building your full process, our beginner-friendly checklist helps: signals provider checklist for beginners.
How United Kings Traders Execute FOMC Signals (A Practical Workflow)
United Kings is built for traders who want clarity: Entry, SL, TP, plus education on how to execute like a pro.
We have a community of 300K+ active traders and a track record-focused approach that targets London and New York sessions—the windows where XAUUSD liquidity is deepest.
Here’s a practical workflow you can use on FOMC days if you’re following our premium Telegram signals.
Step 1: Pre-event alignment (60–15 minutes before)
- Open XAUUSD M5/M15/H1.
- Mark the key levels (e.g., $2665 / $2640 / $2628).
- Decide your no-trade conditions (spread, volatility, missed entry).
Step 2: Event window discipline (0–10 minutes after)
- No market orders at the release.
- Wait for decision range to form.
- Execute only if spread and candle-size filters pass.
Step 3: Confirmation execution (10–30 minutes after)
- Prioritize pullback entries and retests.
- Use $10–$25 stops based on structure.
- Scale partials: TP1 to reduce stress, TP2 to capture trend.
Step 4: Second-wave opportunity (press conference)
- Trade only if price breaks/holds a major level on M5.
- Avoid overtrading; one clean setup is enough.
If you’re new to executing signals via Telegram, you’ll also benefit from: our guide to forex signals on Telegram. The mechanics are similar, and the discipline transfers directly to gold.
And if you trade multiple markets, you can combine gold with majors through United Kings forex signals, while keeping your focus on XAUUSD for FOMC.
FAQ: Trading Gold (XAUUSD) Around FOMC
1) Is it better to trade XAUUSD before or after the FOMC decision?
For most traders, after is better. The first 1–5 minutes are spread-heavy and whipsaw-prone. The 10–30 minute window often offers cleaner confirmation entries.
2) What stop loss size is reasonable for gold during FOMC?
It depends on structure, but during FOMC a typical SL is often $10–$25 from entry. If your plan requires more, reduce position size or skip the trade.
3) Should I use a straddle strategy (buy stop + sell stop) on FOMC?
Most retail traders should avoid it. XAUUSD can trigger both sides in seconds due to whipsaw. A confirmation-based approach (impulse → pullback → entry) is usually more controllable.
4) What’s the best timeframe to confirm entries after the release?
M1 is too noisy for most. We recommend using M3 to M5 closes for confirmation and structure, while using M15/H1 for key levels.
5) Can I follow gold signals around FOMC if I’m a beginner?
Yes, but start on a demo account first and reduce risk. Beginners often struggle with execution speed and emotional control during news. Practice the checklist for 2–3 FOMC events before going live.
Risk Disclaimer: Forex and gold (XAUUSD) trading involves significant risk and can result in the loss of your capital. No strategy or signal can guarantee profits. Past performance is not indicative of future results. Spreads and slippage can widen during high-impact news like FOMC, which may increase losses. If you’re new, practice on a demo account and use strict risk limits.
Join United Kings: Trade FOMC With Structure, Not Stress
If you want to trade gold during Fed rate decisions without guessing, you need two things: a proven signal framework and elite execution discipline.
United Kings delivers premium Telegram signals for forex and gold with clear Entry, SL, and TP levels, education alongside signals, and a community of 300K+ traders. Our approach is built around London and NY sessions—where the best XAUUSD opportunities typically form.
Explore our full offering at UnitedKings.net, review the signal pages at signals and gold signals, then choose a plan on our pricing page:
- Starter: 3 Months — $299 (~$100/mo)
- Best Value: 1 Year — $599 ($50/mo) + FREE ebook (50% savings)
- Unlimited: Lifetime — $999 (pay once)
You can also join our Telegram directly to see the community in action: United Kings Telegram trading channel.
Ready for your next FOMC? Trade it with a checklist, confirmation, and risk control—then let the market do the heavy lifting.


