
Have you ever watched XAUUSD spike 8–15 dollars above a “perfect” resistance… only to reverse so fast you barely had time to blink?
If you trade gold, you’ve lived this. You place a buy stop above a recent high, price tags it, spreads widen, and then XAUUSD dumps $20 like your entry was the market’s target.
That’s not bad luck. In many cases, it’s liquidity. And learning to read XAUUSD liquidity sweeps (buy/sell stops) is one of the cleanest ways to turn “stop hunts” into high-probability entries.
This guide is your XAUUSD signal confirmation checklist. We’ll walk through the exact chart conditions we want—sweep → displacement → structure break → retest zone—and how to place stops and targets in the $2610–$2690 environment, with gold currently trading around $2650 (+0.35% on the day).
TL;DR: XAUUSD Liquidity Sweep Strategy (Quick Checklist)
- Identify the pool: mark equal highs/lows, prior day high/low, Asia range extremes, and obvious swing points where stops sit.
- Wait for the sweep: price must take the level (wick through it), not just tap it.
- Demand displacement: a strong impulsive candle away from the sweep level (often $6–$12 for gold) shows real participation.
- Confirm structure shift: look for a break of structure (BOS) / market structure shift (MSS) after the sweep.
- Enter on retest: use the displacement origin (FVG/imbalance or order-flow zone) as the entry area, not the sweep candle itself.
- SL/TP rules: stop typically $10–$25 beyond the sweep extreme; target 1:2 to 1:3 using next liquidity pool.
What Is a Liquidity Sweep on XAUUSD (and Why Gold Loves It)?
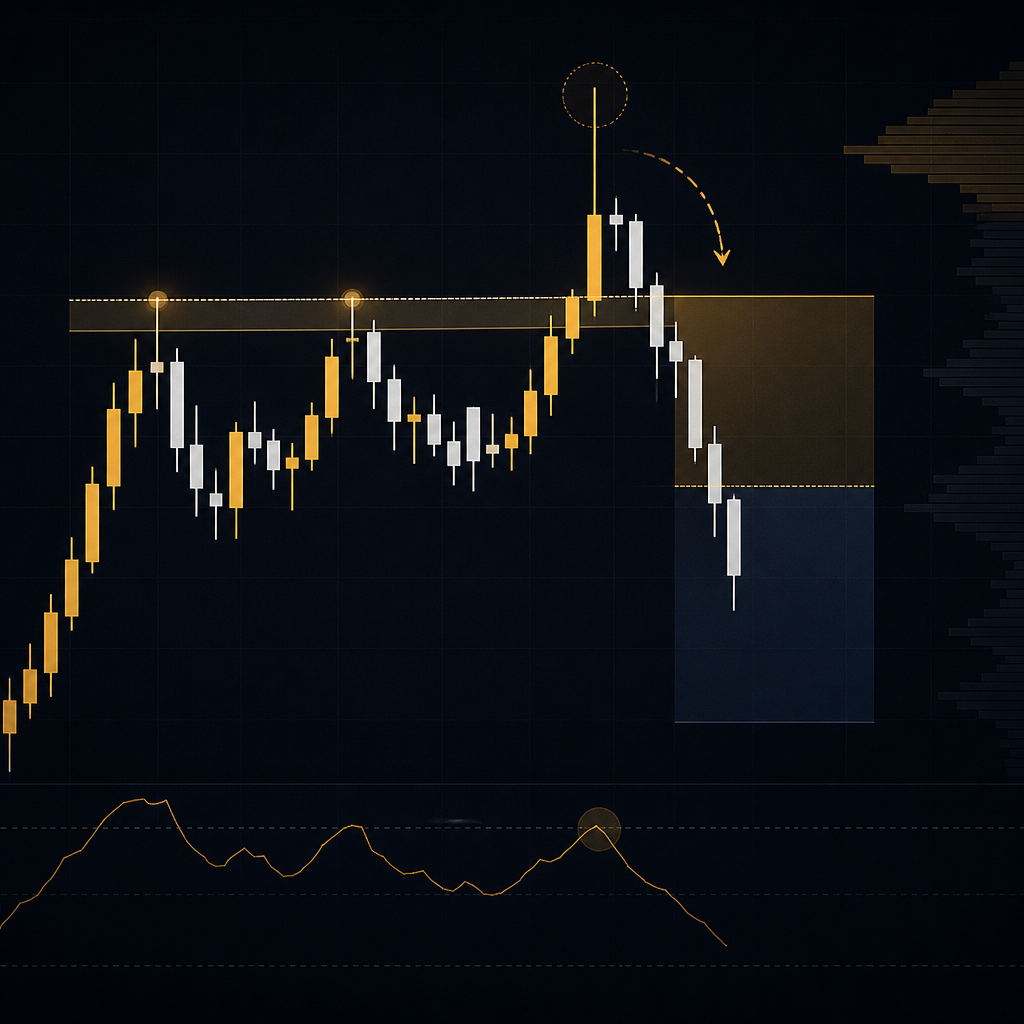
A liquidity sweep happens when price pushes beyond a well-watched high or low to trigger clustered stop orders—then reverses. In practice, it looks like a wick above a recent high (buy-side liquidity) or a wick below a recent low (sell-side liquidity), followed by a sharp rejection.
In gold, these moves are amplified because XAUUSD is a hybrid market. It trades like a risk hedge, reacts to yields and the dollar, and can accelerate during London/NY overlap. With DXY near 106.80 and USD/JPY around 149.50, gold often experiences “headline sensitivity” and liquidity pockets around session transitions.
Let’s define the two sweep types in trader language:
Buy-side liquidity sweep (BSL): “Stop hunt above highs”
Price runs above a prior swing high, equal highs, or the prior day high to trigger buy stops and breakout buys. Then it rejects and rotates lower.
Example near current conditions: XAUUSD prints equal highs around $2662. During London, price spikes to $2668 (sweeping stops), then closes back below $2662. That wick is the “grab.”
Sell-side liquidity sweep (SSL): “Stop hunt below lows”
Price runs below a prior swing low, equal lows, or the prior day low to trigger sell stops and panic selling. Then it snaps higher.
Example: Asia range low sits at $2634. Early NY, gold dips to $2628, instantly reclaims $2634, and then displaces upward to $2646. That’s a classic SSL sweep setup.
Why liquidity sweeps happen (the non-mystical version)
Markets need liquidity to move. Stops are liquidity. When many traders place stops at obvious levels, those zones become “fuel.” That doesn’t mean there’s a conspiracy. It means order matching and positioning naturally concentrate around obvious highs/lows.
Gold is especially prone to this because:
- Volatility is normal: $8–$15 intraday swings are common, so stop clusters are easier to reach.
- Session handoffs create gaps in liquidity (Asia → London, London → NY).
- Macro catalysts (yields, Fed speakers, CPI/PPI) cause quick repricing.
- Retail behavior is predictable: breakout entries above highs and tight stops below lows.
The goal isn’t to “predict manipulation.” The goal is to confirm when a sweep is likely a reversal trigger versus a breakout continuation.
The Liquidity Map: Where Buy Stops and Sell Stops Hide on Gold
You can’t trade a sweep if you don’t know where liquidity sits. Most traders mark support/resistance lines. We mark liquidity pools—areas where many stops are likely resting.
Here are the highest-probability liquidity pools on XAUUSD, especially around the current $2650 region:
1) Equal highs / equal lows (the easiest stop clusters)
Two or more swing highs at similar prices (e.g., $2660–$2662) are magnets. Breakout traders place buy stops just above them. Sellers place stops above them too.
Equal lows around $2638–$2640 attract sell stops below. A sweep often prints a quick wick through, then reverses.
2) Prior day high/low (PDH/PDL)
PDH/PDL are institutional reference points and retail favorites. If yesterday’s high was $2669, it’s a natural target during London or early NY.
The same applies to PDL, say $2622. A dip below it can trigger panic selling and then bounce hard.
3) Asia range high/low (Tokyo box)
Gold often compresses in Asia and expands later. That makes Asia highs/lows perfect sweep targets.
If Asia high is $2658 and London opens with a push to $2664, that can be a BSL sweep before a reversal back into the range.
4) Round numbers and “nice” levels
Levels like $2650, $2660, $2675 attract orders because they’re easy anchors. Sweeps frequently tag these levels by a few dollars.
5) Obvious trendline breaks and breakout boxes
When everyone sees the same breakout level, stops stack there. Gold loves to briefly break out, trigger entries, then mean-revert.
Practical mapping routine (2 minutes):
- Mark PDH/PDL and current day open.
- Box the Asia range (high/low).
- Mark the last 2–3 swing highs/lows on M15 and H1.
- Highlight equal highs/lows and round numbers near price.
This map becomes your “liquidity radar.” You’re not trading every wick. You’re waiting for price to hit a known pool and then show confirmation.
XAUUSD Liquidity Sweep vs Breakout: The One Table That Saves You Losses
The biggest mistake traders make is treating every push above a high as a sweep. Sometimes it’s a sweep. Sometimes it’s a genuine breakout with continuation.
Use this comparison table to separate the two in real time.
| Feature | Liquidity Sweep (Reversal Setup) | Breakout (Continuation Setup) |
|---|---|---|
| What happens at the level? | Wick through + close back inside (rejection) | Clean close above + acceptance above |
| Follow-through candles | Strong displacement in opposite direction | Multiple candles holding above the level |
| Volume/volatility feel | Spike then fade; quick snapback | Expansion that sustains; pullbacks are shallow |
| Structure confirmation | BOS/MSS against the prior swing direction | Higher highs & higher lows (or lower lows & lower highs) continue |
| Best entry | Retest of displacement origin (FVG/zone) | Breakout retest above the broken level |
| Where stops belong | Beyond sweep extreme ($10–$25 typical) | Below breakout structure or retest low |
Gold-specific note: XAUUSD can “fake breakouts” more than majors like EUR/USD (currently ~1.0520) because gold’s intraday range is larger. That’s why we require displacement + structure shift before committing size.
If you want a shortcut: a sweep without displacement is just a wick. A wick is not a signal.
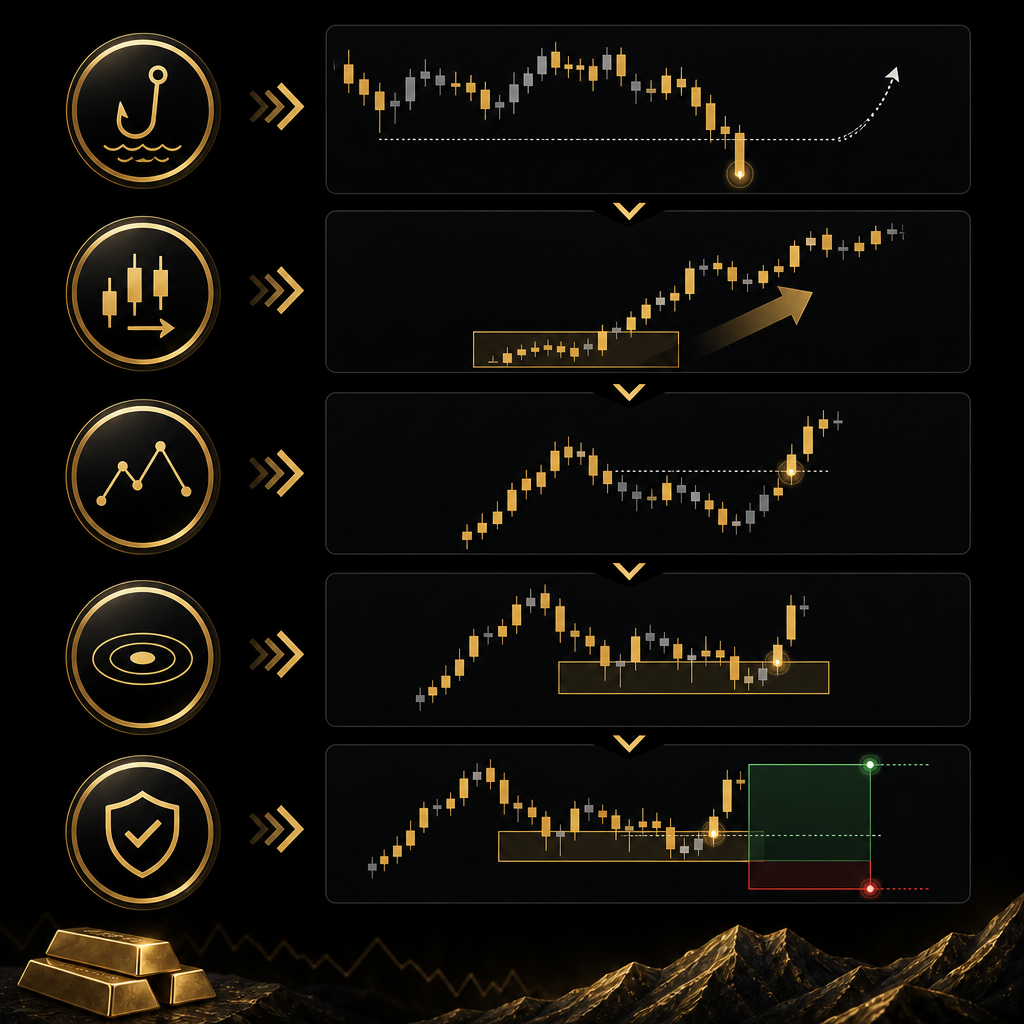
The Step-by-Step XAUUSD Signal Confirmation Checklist (Sweep → Entry)
This is the repeatable process we use to validate a gold stop hunt trading idea before it becomes a trade. Think of it like a pilot checklist: simple, strict, and designed to keep you out of low-quality setups.
Step 1: Identify a “clean” liquidity pool
We want a level that is obvious to many participants. Examples:
- Equal highs at $2662
- Asia low at $2634
- Prior day high at $2669
If the level is messy (many wicks, no clear swing), skip it. Sweeps work best at clean pools.
Step 2: Wait for the sweep (take the stops)
The candle must trade beyond the level. Ideally, you see:
- A wick through by $1–$6 (gold often needs a bit of “overrun”).
- A close back below (for BSL sweep) or above (for SSL sweep).
Example: Price runs from $2656 to $2668 (above $2662 equal highs), then closes the M5 candle at $2659. That’s a meaningful sweep.
Step 3: Demand displacement (the “proof” candle)
Displacement is the market showing intent. On M5/M15, it often looks like a long-bodied candle that moves $6–$12 away from the sweep zone with minimal wick.
Rule of thumb: if price can’t move away from the level, it’s not ready to reverse. You’re early.
Step 4: Confirm a structure shift (BOS/MSS)
After displacement, we want price to break a nearby swing point in the opposite direction. That’s your “trend flip” confirmation.
- After a BSL sweep (above highs), you want a lower low on the execution timeframe.
- After an SSL sweep (below lows), you want a higher high.
Example: Price sweeps $2668, drops to $2652 (displacement), then breaks a prior M15 swing low at $2650. That break is your BOS.
Step 5: Mark the retest zone (where entries are made)
We don’t chase the displacement candle. We mark the “origin” area:
- Fair Value Gap (imbalance) left by displacement
- Last up candle before a bearish displacement (for shorts)
- Last down candle before a bullish displacement (for longs)
This zone is where price often retests to rebalance orders before continuing.
Step 6: Entry trigger + stop placement
Entry triggers can be as simple as a limit order at the retest zone, or a confirmation candle (engulfing, pin bar, rejection) inside the zone.
Stops typically go beyond the sweep extreme. On gold, a realistic SL is often $10–$25 depending on volatility and timeframe.
Step 7: Targets based on the next liquidity pool
Targets should be logical, not emotional. The next pool could be:
- Opposite side of the range
- PDH/PDL
- Asia high/low
- Equal lows/highs
We typically aim for 1:2 to 1:3 risk-reward. If your stop is $12, your TP2 might be $24 and TP3 $36 away.
Two Realistic XAUUSD Examples (Numbers, SL/TP, and Why They Work)
Let’s convert the checklist into two full examples using today’s realistic pricing environment: XAUUSD around $2650, with intraday volatility active.
Example A: Buy-side liquidity sweep → short (London/NY style)
Context: Price has been grinding higher. Traders see equal highs at $2662 from earlier in the day.
- Liquidity pool: Equal highs $2662
- Sweep: London push runs to $2668 (takes buy stops)
- Rejection: M5 closes back below $2662 at $2659
- Displacement: Next M5 candle sells to $2651 (−$8)
- Structure shift: Breaks minor swing low at $2650
Retest zone: The bearish displacement leaves an imbalance between $2658–$2661. Price retraces into that zone.
Entry: Sell at $2659.50 on retest confirmation.
Stop loss: Above sweep high + buffer: $2672.00 (risk ≈ $12.5).
Take profits:
- TP1 (1:2): $2659.50 − (2 × $12.5) = $2634.50
- TP2 (1:3): $2659.50 − (3 × $12.5) = $2622.00
Why it works: You’re not selling the top blindly. You’re selling after stops are taken, after displacement proves sellers are active, and after structure shifts bearish.
Example B: Sell-side liquidity sweep → long (NY reversal style)
Context: New York opens with a dip. Asia range low was $2634. Many traders have stops below.
- Liquidity pool: Asia low $2634
- Sweep: Price spikes down to $2628
- Reclaim: M5 closes back above $2634 at $2637
- Displacement: Next candle runs to $2647 (+$10)
- Structure shift: Breaks a prior M15 swing high at $2644
Retest zone: Bullish displacement origin/FVG around $2639–$2642.
Entry: Buy at $2641.00.
Stop loss: Below sweep low with buffer: $2626.00 (risk ≈ $15).
Take profits:
- TP1 (1:2): $2641 + (2 × $15) = $2671
- TP2 (1:3): $2641 + (3 × $15) = $2686
Why it works: You’re buying after the “flush,” not during it. The reclaim + displacement + BOS tells you the dip likely harvested liquidity and flipped direction.
Session Filters: When Liquidity Sweeps Are Real (and When They’re Traps)
Not all sweeps are equal. The same wick can mean “reversal” in one session and “noise” in another. If you trade XAUUSD without session awareness, you’ll take too many false signals.
Asia session (range-building and “small sweeps”)
Asia often creates tight ranges. Sweeps happen, but they can be shallow and mean-reverting. The best use of Asia is to define the box that London/NY will raid.
- Best approach: mark Asia high/low and wait for London to sweep it.
- Common trap: taking every tiny wick as a sweep signal when volatility is low.
Rule: In Asia, require extra confirmation (clear displacement) or reduce size.
London session (liquidity injection and directional moves)
London is where XAUUSD often picks a direction. Sweeps around PDH/PDL and Asia extremes are especially powerful.
- Best sweeps: London raids Asia high/low and reverses with displacement.
- Best timeframe: M5 to M15 for triggers; H1 for context.
United Kings focuses heavily on London execution because that’s where clean displacement and structure shifts frequently appear.
New York session (continuation or violent reversal)
NY can extend London’s move or fully reverse it. It’s also where U.S. data can hit. With DXY at 106.80 and majors like EUR/USD 1.0520 and GBP/USD 1.2680 sensitive to dollar flows, gold can whip quickly.
- Best sweeps: NY raids London highs/lows, then prints a strong reversal pattern.
- Common trap: trading sweeps right before high-impact news (CPI, NFP, FOMC).
London–NY overlap (highest quality, highest speed)
This overlap often produces the cleanest “sweep → displacement → continuation” sequences. It also produces the fastest stop-outs if you’re late.
Practical filter: If spreads widen and candles become erratic, step back and wait for the retest. The retest is where you control risk.
How to Filter False Sweeps on XAUUSD (The 7-Point “No-Trade” List)
Most losing sweep trades come from forcing a narrative onto random wicks. Here’s a strict filter list. If you see two or more of these, you usually skip.
1) No displacement after the sweep
If price sweeps a level and then drifts sideways, that’s not confirmation. Gold needs to show intent.
2) The sweep happens into major news risk
If a high-impact release is within 15–30 minutes, the sweep can be meaningless. You may get a second, larger sweep on the news spike.
For news behavior and survival rules, pair this guide with our education on how gold signals react to unexpected news events.
3) You’re trading against the higher-timeframe trend without a strong structure shift
Counter-trend sweeps can work, but they need a clearer MSS/BOS and better R:R. Otherwise, you’re stepping in front of momentum.
4) The sweep is too deep (not a sweep, it’s a breakout)
If price pushes $15–$25 beyond the level and holds, that’s likely acceptance. A sweep usually rejects quickly.
5) The retest never happens and you chase
Chasing is how you buy the top or sell the bottom. The retest is where your stop can be logical and tight.
6) The “level” is not a real liquidity pool
A random line you drew is not liquidity. Liquidity is where many traders agree. Equal highs/lows, PDH/PDL, Asia extremes—those matter.
7) Your stop has to be unrealistic for the session volatility
If you need a $30 stop on an M5 setup, it’s not a clean entry. A typical sweep-based SL is $10–$25. More than that often means the structure is unclear.
Pro tip: If you’re unsure whether your sweep is valid, reduce risk or practice on demo. You can also use a provider checklist like our signal provider evaluation checklist to keep your execution disciplined.
Entry Models: Conservative vs Aggressive (and Which Fits Your Personality)
Not every trader should enter the same way. Your entry model should match your psychology. If you hate drawdown, you’ll prefer confirmation. If you hate missing moves, you’ll prefer early entries with smaller size.
Aggressive entry: retest limit at the imbalance
You place a limit order at the FVG/zone after displacement, expecting a quick retest and continuation.
- Pros: Best price, smallest stop, higher R:R potential.
- Cons: More false fills; you can be early if structure isn’t fully confirmed.
Gold example: After a sweep to $2668 and drop to $2651, you set a sell limit at $2660 (imbalance). Stop $2672. Target $2636 (1:2) and $2624 (1:3).
Conservative entry: wait for BOS + retest + candle confirmation
You wait for the structure break, then wait for price to retest the zone, and only enter after a rejection candle.
- Pros: Higher win rate; fewer trades; less stress.
- Cons: Sometimes you miss the move; slightly worse entry.
Gold example: You only short after $2650 breaks (BOS), then enter on a retest to $2659 with a bearish engulfing candle. Same stop logic, slightly reduced R:R but higher confirmation.
Hybrid entry (recommended for most signal traders)
Split your position into two parts:
- Position A: small limit at the zone (aggressive)
- Position B: add only after confirmation candle (conservative)
This reduces the pain of missing a move while keeping your overall decision-making structured.
If you trade with signals, your job is to execute cleanly. For execution best practices, see our Forex signals Telegram beginner guide (the execution rules apply to gold too).
Stop Loss and Take Profit Placement for Sweep Trades (Gold-Specific Rules)
Stops and targets are where sweep traders either become consistent—or donate. Gold’s speed punishes vague risk management.
Stop loss placement: beyond the sweep extreme (with a buffer)
The most logical invalidation is simple: if price sweeps a high and you short, your trade is wrong if price reclaims and holds above that sweep high.
Gold buffer guidelines (typical):
- M5/M15 setups: $10–$18 beyond the extreme in normal volatility.
- High volatility / overlap: $18–$25 beyond the extreme.
Example: Sweep high is $2668. A disciplined SL might be $2679 (11 dollars) or $2686 (18 dollars) depending on volatility.
Take profit placement: target the next liquidity pool
Liquidity tends to travel from one pool to another. After a BSL sweep and reversal, price often seeks sell-side liquidity below range lows, Asia low, or PDL.
TP planning method:
- TP1: 1:1.5 to 1:2 at the first logical pool (partial close).
- TP2: 1:2 to 1:3 at the next major pool (runner).
- Optional: trail above lower highs / below higher lows after TP1.
Position sizing: keep the math boring
Gold can move $10 in minutes. That’s why position sizing must be rule-based. Risk a fixed % per trade (many disciplined traders use 0.5%–1%).
If you want a full framework, use our risk management strategies when using forex signals—the same principles apply to XAUUSD.
Common SL/TP mistakes (and how to avoid them)
- Stop too tight: placing SL inside the sweep wick zone gets you clipped on retests.
- Target too ambitious: aiming beyond a major liquidity pool without scaling out.
- No partials: gold often gives clean TP1 then retraces; partials pay you for being right.
The goal is not to “never get stopped.” The goal is to structure trades so your winners are meaningfully larger than your losers.
Multi-Timeframe Framework: The Cleanest Way to Trade Sweeps Without Noise
Liquidity sweeps are easiest when you separate context from execution. Most traders do the opposite: they execute on noise and then justify it with higher-timeframe lines.
Step 1: H1/H4 for bias and major pools
On H1/H4, mark:
- Major swing highs/lows
- PDH/PDL
- Weekly high/low (if relevant)
- Large equal highs/lows
This tells you where the “real” liquidity sits. If H1 shows equal highs near $2685, don’t assume a tiny M5 sweep at $2662 is the day’s top.
Step 2: M15 for structure and setup quality
M15 is the sweet spot for seeing structure shifts without being whipsawed. You can spot a proper BOS/MSS and define the retest zone.
Step 3: M5 for entries and precision
M5 is where you time entries and place tight, logical stops. But you only use M5 after the higher timeframes tell you the sweep is happening at a meaningful pool.
Practical workflow (3 screens, one idea):
- H1: “Where are we likely to raid?”
- M15: “Did structure shift after the raid?”
- M5: “Where is the retest zone and entry trigger?”
This reduces overtrading and improves your ability to hold winners to the next liquidity pool.
How United Kings Confirms Sweep-Based Gold Signals (What You Should See)
If you follow Telegram signals, your edge often comes from two things: signal quality and execution discipline. At United Kings, our approach is built around repeatable confirmation—especially during London and New York sessions.
When we send a sweep-based idea, you’ll typically see clear, practical levels:
- Entry (often at a retest zone rather than the wick extreme)
- Stop loss placed beyond the sweep high/low with a realistic buffer
- Take profits mapped to the next liquidity pools
That’s the difference between “sell now” and a structured plan you can execute.
We also teach you why the trade exists. That education matters because gold conditions change. Today gold is around $2650, and volatility is healthy. Tomorrow, a macro catalyst can change the rhythm.
If you want to see how our broader signal ecosystem works, explore:
- United Kings premium trading signals (all markets)
- Gold (XAUUSD) signals with clear Entry/SL/TP
- Forex signals for major pairs
And if you diversify beyond gold, we also cover other markets—see our crypto signals page for how we handle volatility-driven assets.
Community note: We’re not a tiny chat. United Kings is built around a large, active trader base (300K+), so you’re learning in a real environment with constant chart discussions and execution feedback.
Common Mistakes Traders Make With Gold Stop Hunts (and Fixes That Work)
Most traders don’t fail because they can’t spot a wick. They fail because they don’t follow a process. Here are the most common liquidity sweep mistakes we see—and the fixes.
Mistake 1: Selling the sweep candle (or buying the flush) with no confirmation
This is the classic “catch the top” impulse. Sometimes it works. Often, you get a second push that stops you out before the real reversal.
Fix: wait for displacement, then trade the retest zone. You’ll feel late, but your stop becomes logical.
Mistake 2: Ignoring session context
A sweep at 2am London time can be meaningless. A sweep at London open can define the day’s direction.
Fix: treat Asia as mapping, London/NY as execution. If you can only trade one window, pick London or NY and specialize.
Mistake 3: Stops placed at “nice numbers” instead of invalidation
Putting a stop exactly $10 away because it “sounds right” is not risk management. It’s hope.
Fix: stop goes beyond the sweep extreme + buffer, sized to volatility. Then adjust lot size to keep risk constant.
Mistake 4: Taking profits randomly
Gold moves fast, so traders panic-close. Or they hold forever and give it back.
Fix: scale out at the next liquidity pool. If your TP1 is $2634.50, take partial there and let the rest target $2622.
Mistake 5: Overtrading every level
Gold can sweep multiple micro-levels in a trend day. If you trade all of them, you’ll churn.
Fix: trade only sweeps at major pools (PDH/PDL, Asia extremes, clean equal highs/lows) and require structure shift.
If you want a broader view of what separates premium from noisy signals, compare approaches in our guide to the best forex signals (the same quality criteria apply to gold).
FAQ: XAUUSD Liquidity Sweeps (Buy/Sell Stops)
1) What timeframe is best for an XAUUSD liquidity sweep strategy?
Use H1/H4 to mark major liquidity pools and bias, M15 to confirm structure shifts, and M5 for entries. If you only use one execution timeframe, M5 or M15 is usually best.
2) How far should gold sweep beyond a high/low to be valid?
There’s no fixed number, but on XAUUSD a meaningful sweep often runs $1–$6 beyond the level and then quickly rejects. If it pushes $15+ and holds, it may be acceptance (breakout), not a sweep.
3) Where do I place my stop loss on a sweep trade?
Typically beyond the sweep extreme with a volatility buffer. In normal conditions, many sweep trades use $10–$25 stops depending on session speed and the quality of the retest entry.
4) Why do liquidity sweeps fail sometimes?
Common reasons include: trading during news spikes, no displacement after the wick, misidentifying a random level as liquidity, or fading a strong trend without a confirmed structure shift.
5) Can beginners trade stop hunts on gold?
Yes, but beginners should start on demo and focus on the checklist (pool → sweep → displacement → BOS → retest). Keep risk small and prioritize clean execution over frequency.
Risk Disclaimer (Read Before You Trade)
Trading forex and gold (XAUUSD) involves significant risk and may not be suitable for all investors. You can lose some or all of your capital. Past performance and win rates do not guarantee future results. Signals and examples in this article are for educational purposes and are not financial advice. If you are new, consider practicing on a demo account first and use strict risk management on every trade.
Join United Kings: Premium Gold Signals With Clear Confirmation
If you want sweep-based entries without guessing, join the United Kings community and trade with structured levels. We publish premium Telegram signals with clear Entry, SL, and TP, built for London and New York session execution, alongside ongoing education.
- Gold + Forex coverage with a disciplined, confirmation-first approach
- A large, active community of 300K+ traders
- Transparent plans and simple onboarding
- 48-hour money-back guarantee (terms apply)
View plans on our pricing page:
- Starter (3 Months): $299 (~$100/mo)
- Best Value (1 Year): $599 ($50/mo) + FREE ebook (50% savings)
- Unlimited (Lifetime): $999 (pay once)
Ready to receive signals and discuss setups live? Join our Telegram now: United Kings official Telegram channel.
And if you want to learn more about who we are before subscribing, visit about United Kings or reach us via contact.